Unity - Computer AI Auto Move Script
Downloading your Car
For this assignment you can (and should) use one of the free cars (or other appropriate vehicle) in the Unity Asset Store. To do this simply click on the Asset Store tab and select Vehicles and then Free and take your choice of vehicle. NB: be mindful of whichever vehicles you choose i.e. choose a single vehicle in each case without any pre-created script attached or any other 'baggage' attached. Once this is done then download two cars: one for the player and one for the computer AI.
Setting Up the waypoints
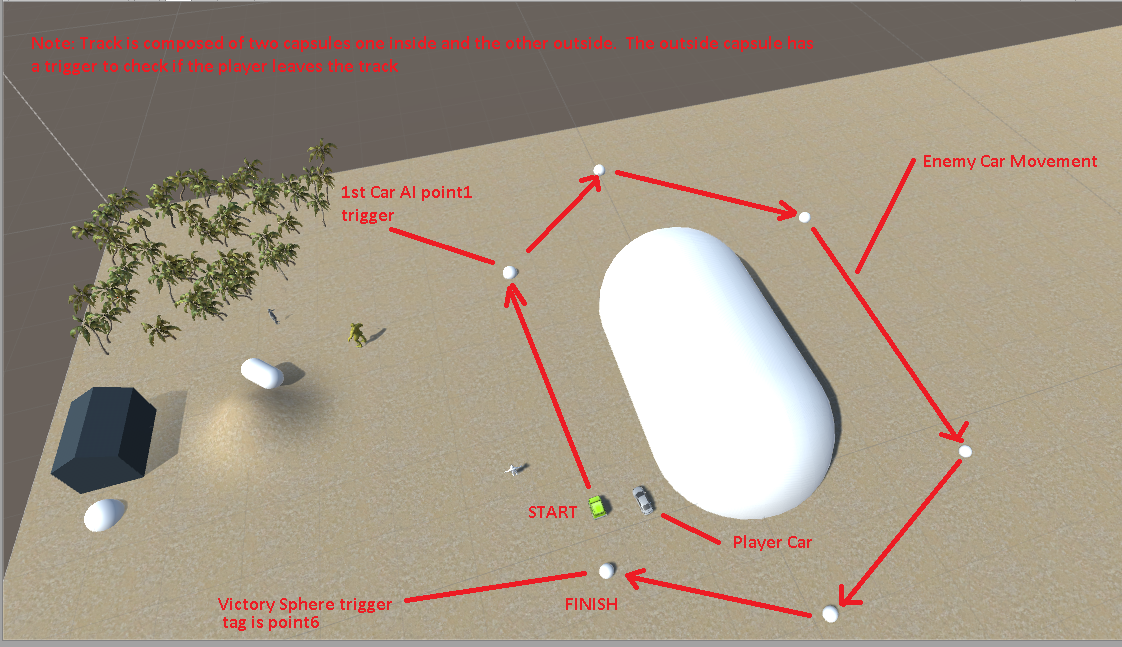
Next create and place down as many spheres (or cubes etc) as needed for the computer to successfully navigate your track. In the screenshot below six waypoints are used for the simple track shown but be aware that for your actual track more may be required. The sixth is the final waypoint for the finish line and should contain the victory/defeat trigger code to check whether the players car or the computers has gotten there first. Each of the spheres is tagged as 'point1','point2',......'point6' etc so that they can be recognised by the trigger on the computers car.
Operation of the Computer AI Script
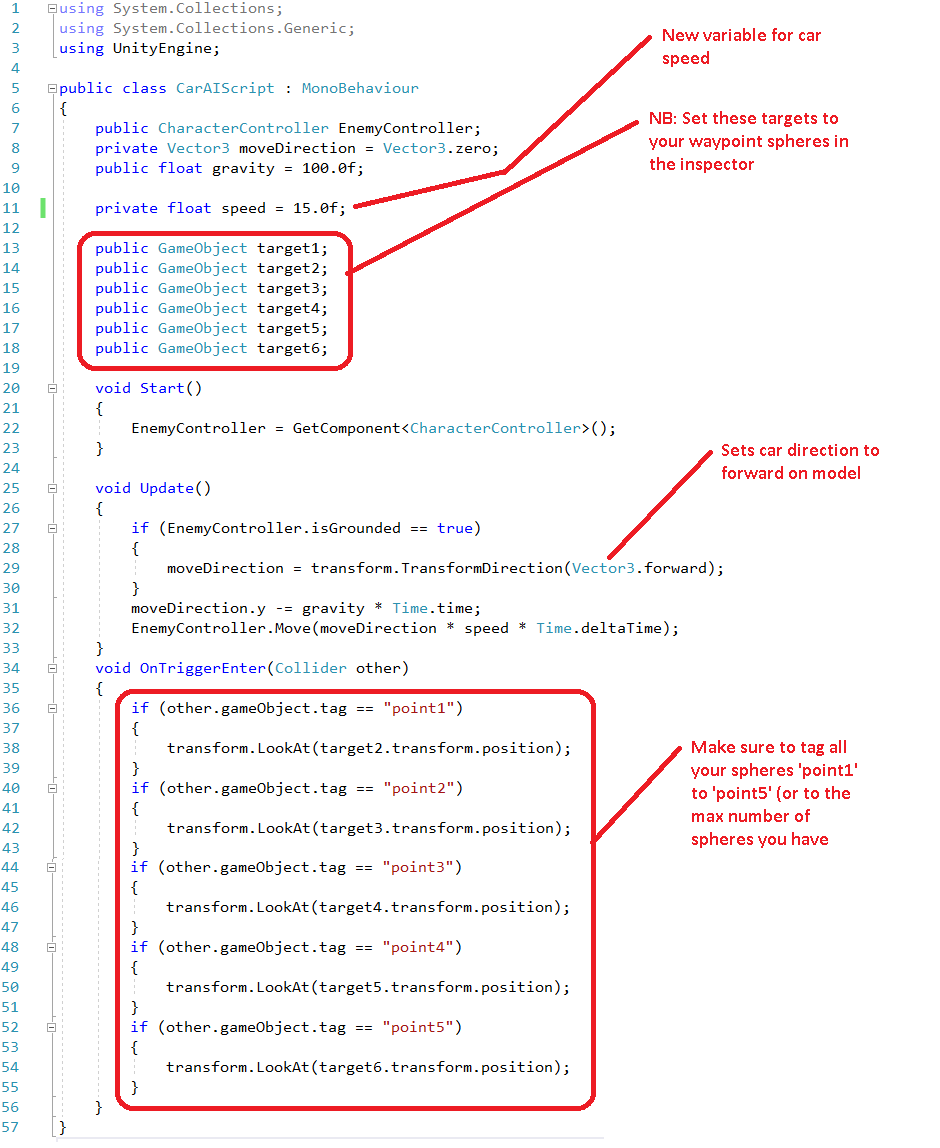
The code in the computer AI movement script is very similar to that in your previous character movement script i.e. it uses a character controller to avoid going through rigid bodies and uses the same basic code in the Update( ) function to move the car. The main difference with the computer cars movement is that it is not linked to the keyboard in any way i.e. it just keeps moving forward until something tells it to change direction and then it moves in the new direction. This is achieved by the line:
For this assignment you can (and should) use one of the free cars (or other appropriate vehicle) in the Unity Asset Store. To do this simply click on the Asset Store tab and select Vehicles and then Free and take your choice of vehicle. NB: be mindful of whichever vehicles you choose i.e. choose a single vehicle in each case without any pre-created script attached or any other 'baggage' attached. Once this is done then download two cars: one for the player and one for the computer AI.
Setting Up the waypoints
Next create and place down as many spheres (or cubes etc) as needed for the computer to successfully navigate your track. In the screenshot below six waypoints are used for the simple track shown but be aware that for your actual track more may be required. The sixth is the final waypoint for the finish line and should contain the victory/defeat trigger code to check whether the players car or the computers has gotten there first. Each of the spheres is tagged as 'point1','point2',......'point6' etc so that they can be recognised by the trigger on the computers car.
Operation of the Computer AI Script
The code in the computer AI movement script is very similar to that in your previous character movement script i.e. it uses a character controller to avoid going through rigid bodies and uses the same basic code in the Update( ) function to move the car. The main difference with the computer cars movement is that it is not linked to the keyboard in any way i.e. it just keeps moving forward until something tells it to change direction and then it moves in the new direction. This is achieved by the line:
moveDirection = transform.TransformDirection(Vector3.forward);
Where Vector3.forward is shorthand for Vector3(0.0f,0.0f,1.0f); and sets the direction of the models movement to the forward facing of the model. NB: Sometimes (as with models exported from 3DMax the forward part of the model is not this vector. If this is the case then the car (or other model) will move sideways or even up or down.
Implementation of gravity and speed are the same as before with a new float variable called speed which should be set to a suitable value appropriate to the difficulty of the game i.e. the higher the value of speed the more difficult it will be to beat the AI. All of the above movement code is placed in the Update( ) function.
Next a box collider is placed around the computer car (which is set as a trigger and the car a rigid body) and six (or more) GameObject variables are added called target1 to target6 respectively. These are set to each waypoint in the inspector e.g. target1 should be set to Sphere1 (tagged point1), target2 set to Sphere2 (tagged point2) etc.
Finally an OnTriggerEnter(Collider other) function is placed just outside the Update( ) function block and a series of if statements placed therein that check if the Sphere activating the trigger is tagged point1, point2 etc. Whatever point is triggered the code within the if statement tells the car to Look At the next Sphere in the sequence i.e. to turn and face that direction and since the car is still moving it will simply turn and continue towards the new waypoint. For example if the car has reached Sphere1 (tagged point1) it will activate the code in that if statement telling it to turn and face the direction of target2's transform position (where target2 is set to Sphere2 in the inspector) and ditto for the other if statements. The only exception is Sphere6 which has its own Victory/Defeat trigger code. However you should place your own code in the script below to tell the computers car to stop when it reaches the sixth waypoint (or whichever is your last waypoint:
Sample computer AI Movement script
To make this whole process a bit clearer below is a screenshot of a simple race track with six waypoints and two cars set up. The path around the track is also shown:
Note: your track and level should be a lot better looking than this simple example e.g. a proper path/track with textures along with objects (hills, trees etc) bounding the track circumference. Your waypoint spheres should be invisible in the final level.